Personal Arch Install Guide
A personal install guide of arch linux
[!WARNING] This is still under construction. Do not follow!
My Linux journey started around October 2021. I’ve dual booted PopOS and ended up using Linux for most of the time. At that point, I ended up just erasing everything and install PopOS as my stand alone Operating System. Few months after, and I was hooked on the tiling feature of PopOS. I decided to have a look at the Keyboard Shortcuts and noticed the hjkl being used as arrows. I don’t have to leave my keyboard to reach for the arrows? How cool … Another few months and Windows seemed rudimentary. I did not have to go out and install software, I had the screen automatically adjust for me (tiling), and had shortcuts for browser, terminal and so on.
I was constantly watching other videos based on Linux and noticed that they were referring to hjkl keys as Vim keys. Next thing I knew, I ended up using Neovim and wasted ages configuring it. Luckily this was during my masters, in pandemic times, and I had no social life.
After about a year of playing with my Desktop Environment (DE) I was quite satisfied. But there was one itch that I had to scratch. PopOS tiling is based on i3, so it seemed only natural to give that one a try. I installed i3 from Ubuntu’s official repo’s, and it lacked a lot of modern features. Keep in mind that I was using the 22.04 version as PopOS was now developing their own Rust based DE.
A lot of effort went into configuring i3, including wasting around 2 weeks configuring the bar (polybar). A lot of things were not working due to the outdated packages in the repositories, so it never actually felt right. However, I managed to fix a few things that were frustrating me such as logging out, and screen tearing. Also utilities like screenshots were relatively sorted. Things were working …
While I was pretty happy with the things, I decided I want something a little bit more dynamic. So here comes Qtile. Qtile worked like a charm for me, and my python familiarity was paying dividends. A config I can finally understand and thinker with. I also started to explore different programs: lf, ly and the likes. What I got from here was simple, the programs that I want to use are not in Ubuntu’s repositories … So … I decided to install arch and make my life “easier”. Also, it seemed like for everything I wanted to do, PopOS set it up for me in the way they thought I wanted it done. Colors, xrandr and so on were all set by System76 devs. It is the same with all the DE’s, they make “sensible” choices, and then it takes you hours to find out that your “realsense” camera is not working because of brltty, a utility for blind people. Very mindful of Ubuntu’s devs, but for me? I don’t need that stuff, and it was getting in the way, causing a lot of debugging frustrations.
And this is how I ended up wanting to install Arch. I needed something that allowed me to do things from a blank canvas. And if I f**d up, it was me, and I could trace it back.
So here we go, this is my guide on installing arch. It is not really meant for “you”, the reader. It started as just a way for me to document my process of installing it, while in a virtual machine (VM), so I can repeat the process with ease on actual hardware. Also, archwiki is just amazing, but the information is pretty scattered. So if you want to do anything, you have to read a few guides and put the pieces together. So this is what I have done, I put a few bits and pieces together from archwiki in a way I would understand it whenever I wanted to install Arch. Anyone could do this by just reading the f*****g manual (RTFM). I would also follow the installation_guide closely. Be aware, if you break your PC, is on you! Now, let’s start the installation.
Pre-installation
I would be using a few key features:
- BTRFS filesystem
- Snapper for snapshots
- LVM on LUKS
This should be secure enough while keeping things “simple”.
Basics
If you have a HiDPI screen:
setfont ter-132b
Change the keyboard layout if you need to (the default is us):
[localectl](localectl.md) list-keymaps
loadkeys <chosen key> # loadkeys uk for example
Check boot mode (link). If you get an output for the following, you should be good to go:
cat /sys/firmware/efi/fw_platform_size
Check for network connectivity:
ping archlinux.org
If you do not get a response to the request, make sure you have a cable connected or connect via wireless by using iwctl:
- Enter in the interactive prompt:
iwctl - Show the devices such as
wlan0:device list - Search for networks:
station wlan0 get-networks - Exit the prompt:
<CTRL+d> - Connect:
iwclt --passpharese "<your_passphrase>" station <your_station> connect <network_name>
Check for an ip address:
ip addr
Start the sshd if you want to connect from another pc. It makes the process a lot easier:
systemctl start sshd
Set a password for the root (needed for the ssh):
passwd
Disk partitioning
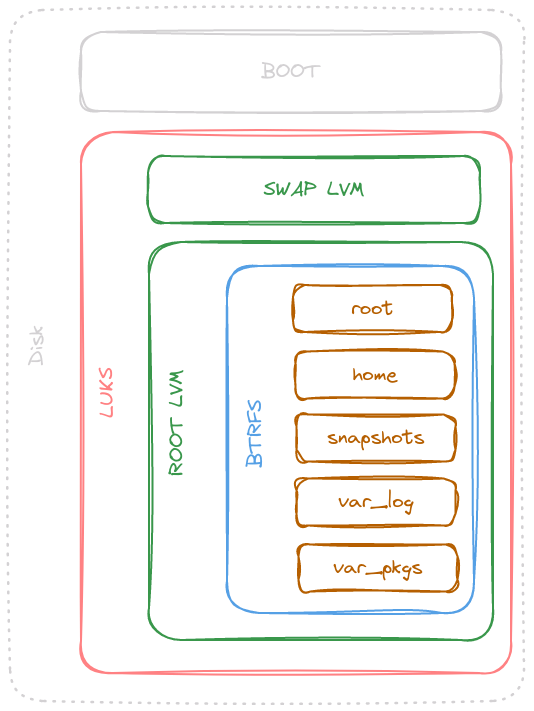
To make things simple and secured, I will create an LVM on LUKS setup. The idea is that a full partition would be encrypted, and then it can be altered as wished. Another benefit of this setup is that it allows for suspend-to-disk of the swap partition. This means that the device can be put to hibernate and all the information will be saved onto the encrypted swap partition. The overall partitioning can be viewed above, where the summary of information can be viewed bellow:
| Partition | Partition Type | Partition Size | Encryption | LVM Physical Volume | Volume Group | Logical Volume | Logical Volume Size | Filesystem | Subvolume Number | Subvolume Name | Mountpoint |
|---|---|---|---|---|---|---|---|---|---|---|---|
| /dev/sda1 | UEFI | 1G | No | No | N/A | N/A | N/A | N/A | N/A | N/A | /boot |
| /dev/sda2 | LUKS | Rest of disk | Yes | Yes | vg0 | lvmswap | RAM size + 8-12G | swap | N/A | N/A | N/A |
| lvmroot | Rest of the space | btrfs | 1 | @ | / | ||||||
| 2 | @home | /home | |||||||||
| 3 | @snapshots | /.snapshots | |||||||||
| 4 | @var_log | /var/log | |||||||||
| 5 | @var_pkgs | /var/cache/pacman/pkg |
Create boot and LUKS partitions
To find the device we want to partition use lsblk. This will list all block devices. In my virtual machine, my block device is called vda.
Create the following partitions using fdisk:
- A boot partition (size 1G)
- A LUKS partition with the rest of the memory
For more information have a look at the archwiki.
We also want to wipe the data from the drive. Use:
wipefs -a <target device>
With the two partitions created, we can now format them:
mkfs.fat -F 32 /dev/<efi_system_partition>
For example with mkfs.fat -F 32 /dev/vda1.
Next step is to encrypt the second partition:
cryptsetup luksFormat /dev/<partition>
Now we need to open it and map it to a name. Mine will be called cryptlvm but feel free to call it mysuperamazingpartition if you want. But be aware that you will have to type the name for quite a few times.
cryptsetup open /dev/<partition> cryptlvm
Creating the LVM volumes
Create a physical volume on top of the opened LUKS container:
pvcreate /dev/mapper/cryptlvm
Create a volume group (i.e. vg0):
vgcreate vg0 /dev/mapper/cryptlvm
Create all logical volumes on the volume group. As mentioned before, the two logical volumes I need are lvmroot and lvmswap:
lvcreate -L 28G vg0 -n lvmswap
lvcreate -l 100%FREE vg0 -n lvmroot
Format the logical volumes:
mkswap /dev/vg0/lvmswap
mkfs.btrfs /dev/vg0/lvmroot
Enable swap:
swapon /dev/vg0/lvmswap
Make the BTRFS subvolumes
I am going for the following subvolumes layout, inspired by this and this. I am planning to use snapper as my snapshot manager. A tip recommended by the wiki is to make a subvolume for things that you do not want to be included in the snapshots.
| Subvolume Number | Subvolume Name | Mountpoint |
|---|---|---|
| 1 | @ | / |
| 2 | @home | /home |
| 3 | @snapshots | /.snapshots |
| 4 | @var_log | /var/log |
| 5 | @var_pkgs | /var/cache/pacman/pkg |
To make the btrfs subvolumes, the partition has to be mounted:
mount /dev/vg0/lvmroot /mnt
cd /mnt
Now the subvolumes can be created as following:
btrfs subvolume create @
btrfs subvolume create @home
btrfs subvolume create @var_log
btrfs subvolume create @var_pkgs
btrfs subvolume create @snapshots
Now we can mount the subvolumes. First cd out of the root:
cd
umount /mnt
We can now mount the root:
mount -o subvol=@ /dev/vg0/lvmroot /mnt
Create the directories:
mkdir -p /mnt/{boot,home,.snapshots,var/log,var/cache/pacman/pkg}
And mount the subvolumes:
mount -o subvol=@home /dev/vg0/lvmroot /mnt/home
mount -o subvol=@snapshots /dev/vg0/lvmroot /mnt/.snapshots
mount -o subvol=@var_log /dev/vg0/lvmroot /mnt/var/log
mount -o subvol=@var_pkgs /dev/vg0/lvmroot /mnt/var/cache/pacman/pkg
Finally, we can mount the boot partition:
mount /dev/vda1 /mnt/boot
Installation
Install essential packages
The basic installation is just pacstrap -K /mnt base linux linux-firmware. However, there are a few things that are needed to be installed and are recommended as in the wiki. The main things we need are:
- CPU microcode updates:
amd-ucodeorintel-ucode; - Utilities for filesystem:
btrfs-progs; - LVM management:
lvm2; - Firmware not included in
linux-firmware(none on my end);
[!WARNING] The
microcodeis not included in the following command. Include it yourself!
pacstrap -K /mnt \
  base base-devel \
  linux linux-headers linux-firmware \
  linux-lts linux-lts-headers \
  btrfs-progs \
  lvm2 \
  neovim git \
Generate fstab
genfstab -U /mnt >> /mnt/etc/fstab
Essential Config
Enter the system:
arch-chroot /mnt
Set root password:
passwd
Set the time
ln -sf /usr/share/zoneinfo/<Region>/<City> /etc/localtime
hwclock --systohc
Create the hostname file /etc/hostname:
<yourhostname>
Set up the locale
Uncomment the required locale in /etc/locale.gen such as:
en_GB.UTF-8
Add the main locale in /etc/locale.conf:
LANG=en_GB.UTF-8
Generate the locale:
locale-gen
Install rest of packages
Now there are a few packages left. Feel free to adapt this to your case:
- Boot loader:
grub,grub-btrfs; - Filesystem tools:
efibootmgrdosfstoolsmtoolsos-prober, andsudo; - Display Drivers:
nvidia,nvidia-lts,nvidia-open(if Touring+),nvidia-utils,nvidia-settings; - Utilities:
bash-compretion,openssh,reflector,flatpak,lxappearance; - Snapshots Manager:
snapper; - Software packaging:
flatpak; - Networking software:
networkmanager,networkmanager-applet, andiwd; - Console text editor:
neovim(for me, for you might benano); - Documentation accessing software:
man-db,man-pages,texinfo,andtldr; - Bluetooth:
bluez,bluez-utils; - Sound System:
pipewire; - Printing:
cups;
sudo pacman -S \
  grub grub-btrfs \
  efibootmgr dosfstools mtools os-prober sudo \
  nvidia-open nvidia-utils nvidia-settings \
  bash-completion openssh reflector flatpak lxappearance \
  snapper \
  flatpak \
  networkmanager network-manager-applet \
  iwd \
  man-db \
  man-pages \
  texinfo tldr \
  cups \
  bluez bluez-utils \
Create your user
useradd -m -g users -G wheel <username>
passwd <username>
Add yourself to “sudoers” file /etc/sudoers:
echo "<username> ALL=(ALL) ALL" >> /etc/sudoers.d/<username>
Edit mkinitpio at /etc/mkinitcpio.conf
This step is required because I am using encryption
I added encrypt before filesystem in hooks and btrfs in modules, see here and here.
Two changes are necessary here. Firstly, the btrfs module has to be loaded:
MODULES=(btrfs)
Next, you have two options. One is to use the default busybox then add lvm2 and encrypt to hooks:
HOOKS=(base udev autodetect microcode modconf kms keyboard keymap consolefont block **encrypt** **lvm2** filesystems fsck)
Alternatively add the following hooks for systemd based setup:
HOOKS=(base systemd autodetect microcode modconf kms keyboard sd-vconsole block sd-encrypt lvm2 filesystems fsck)
It is a matter of preference on which one you chose. systemd is a bit more versatile.
Regenerate the images (needs to be done for every kernel):
mkinitcpio -p linux
mkinitcpio -p linux-lts
Setup GRUB
Install grub application
grub-install --target=x86_64-efi --efi-directory=/boot --bootloader-id=GRUB
Copy UUID of the encrypted device (not the mapped one):
blkid
Add the device to the default cmd in /etc/default/grub:
GRUB_CMDLINE_LINUX_DEFAULT="loglevel=3 rd.luks.name=<device-UUID>=cryptlvm root=/dev/vg0/lvmroot resume=/dev/vg0/lvmswap quiet"
Regenerate config:
grub-mkconfig -o /boot/grub/grub.cfg
Enable services
systemctl enable NetworkManager
systemctl enable bluetooth
systemctl enable cups.service
systemctl enable sshd
systemctl enable reflector.timer
Do a restart :
exit
umount -a
reboot
At this point, we have a clean installation. From here, you have a clean slate to work on. In the following parts, I will set up the Swap encryption and snapper.
Snapper (link)
Prerequisites
Before setting up everything the packages cron and snapper are required:
pacman -S cronie snapper
Now let’s start the cron systemctl service:
systemctl enable cronie.service
systemctl start cronie.service
Setup
I will assume that the subvolume for snapper was created as in make-the-btrfs-subvolumes.
For the setup, we first have to delete the folder /.snapshots:
rm -rf /.snapshots
Generate the snapper config:
snapper -c root create-config /
Delete the folder created by snapper:
rm -rf /.snapper
Mount the snapper subvolume:
mount -o subvol=@snapshots /dev/vg/root /.snapshots
Make the mount permanent:
mount -a
And give the folder 750 permissions:
chmod 750 /.snapshots
Setting up paru
sudo pacman -S --needed base-devel
git clone https://aur.archlinux.org/paru.git
cd paru
makepkg -si
General Setup
The desktop environment route
If you are interested in a full desktop environment, you could just install one and be done. For example:
sudo pacman -S gnome gnome-tweaks
sudo systemctl enable gdm
After a restart you should be greeted by GDM.
That should do it for now. You should now have a fully functional system.